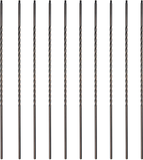
- ▼ Myard classic balusters connect the handrail to the staircase properly, providing both safety and refinement, and making perfect match with Myard baluster shoes (sold separately).
- ▼ Made from quality hollow forged iron balusters + satin black powder coated finish for perfect balance between beauty, durability.
- ▼ Hollow design for easily cutting to required height. Yield strength test passed, up to 300 LBs/each bar.
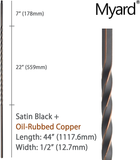
- ▼ Color options: Satin Black, Satin Black + Oil-Rubbed Copper. ▼ Various styles for indoor guardrail, fence, stair remodelling, create your own combinations.
- ▼ Product specifications: 1/2" square; 44 inches in length; Pack of 10.
Product Description
Myard is a leading brand in stair styling, offering abundant and various outdoor and indoor balusters and tools in different sizes, colors and finishes that personalize your deck, indoor stair and home improvements.
As for indoor stair balusters, there are 9 styles. Also, accessories, shoe adapters are available in this listing.
Baluster tubes are all in specifications: 1/2" X 1/2" square; 44 inches. Choose and combine different types to create your own style stair showcase.
| Color | Satin Black, Oil-Rubbed Copper | Satin Black, Oil-Rubbed Copper | Satin Black, Oil-Rubbed Copper | Satin Black, Oil-Rubbed Copper | Satin Black, Oil-Rubbed Copper | Satin Black, Oil-Rubbed Copper |
|---|
| Color | Satin Black, Oil-Rubbed Copper | Satin Black, Oil-Rubbed Copper | Satin Black, Oil-Rubbed Copper | Satin Black, Oil-Rubbed Copper | Satin Black, Oil-Rubbed Copper | Satin Black, Oil-Rubbed Copper |
|---|
| Sizes & Models | Click picture above to see more | Click picture above to see more |
|---|
Features:
|
|
|
|
|
|---|---|---|---|
Quality Steel TubeHigh yield High Yield Steel strength steel used for less deformation and better holding. Hollow tube for easy cutting to desired length. | Maintenance FreeIn most cases, a standard stair fencing system with iron balusters requires less maintenance work, like repainting. They will only need occasional cleaning. (Detergent is not recommended, due to the corrosion to the coating.) | Powder CoatingLong-lasting powder coating for indoor stair use. Durable finish very resistant to scratches, cracking, peeling, UV rays and rust. Color:
| CompatibilityCompatible with / replace most house indoor stair balusters in specs below:
|
How To Install Stair Iron Balusters
|
|
|
|
|
|---|---|---|---|
| Step 1 – Cover furniture and carpets to catch the sawdust created when cutting the wood balusters. Step 2 – Cut old wood balusters with reciprocating saw or jig saw. Step 3 – Remove old balusters by slowly wobbling them until the nails are loose. Then use the pliers to wiggle them out. | Step 4 – Drill appropriate size holes for your balusters at the bottom of the handrail and the top of the base (tread/floor). (Tips: Round holes are preferred if baluster shoes are planned. Otherwise, square holes have better finish look). Recommended drilling depth:
| Step 5 – Measure and cut iron balusters with leaving 3/4" longer than the distance from the bottom of the handrail to the top of the base (tread/floor). This gives you enough room to slide the baluster up into the rail and then drop it down into the hole. (Tips: Portaband saw or chop saw with metal cutting blade is required.) Line up your baluster twist, knuckles, basket or spindle scroll by cutting all from one side or cut some from both sides. | *Step 6 – If you use baluster shoes to cover both ends, slide them (bottom, or top+bottom) to the middle of the balusters before inserting balusters into holes. If you are using shoes, Add them in step 7 and then insert the iron balusters into the holes. Step 7 – Apply about a dime size drop of epoxy (or silicone glue) in the top and bottom holes. Then, slide the shoes into place and tighten with screws them (Internal hexagonal wrench required). Allow up to 24 hours for the epoxy to fully dry. |
Customer Reviews
showing - of reviews


